Pages


Showing posts with label canning. Show all posts

Wednesday, May 28, 2014

Spring, Farming, and Projects!

Life gets a little busy at times for any mom, but I regret that I haven't had time to blog lately. I've been busy with a lot of little (and some big) projects, kids and work. Eric is busy out in the field and on the farm, and I am busy with refinishing furniture, painting bedrooms and the bathroom, and keeping up with the house and gardens. We've spent very little time outdoors until a week ago because it rained almost every day. Now that it is nice, it is hard to sit still knowing that there is so much to be done!
 
Memorial Day 2014
 
Clara's birthday was a lot of fun. We did a farm theme, of course. I'm shocked I hadn't done that one yet! The cake took me FOREVER, or at least 3 hours. And Clara got a nice black eye for all of her birthday pictures with a minor incident on the stairs. But all in all, I'm really enjoying this whole throw a big birthday party thing. Let's hope I outgrow this phase in a year or two.


The kids really enjoyed the piñata... except that they couldn't break it. A bunch of little girls vs. piñata equals an adult needing to get involved.
 
 
Memorial Day was enjoyable.  There are a lot of birthdays in the month of May, so a lot of time was spent with family this month. Family is such a joy, and I truly appreciate how close we all are on both sides.  I took some pictures of the girls on Memorial Day with their red, white, and blue outfits because they were so cute in coordinating colors.


I will have to post some pictures later of the furniture and house projects. I have been having a lot of fun with a coffee table and television cabinet. I'd bought these two units for sale at the Crawford Furniture liquidation, and they weren't quite the right stain color. So I sanded with an orbital power-sander, stained, and sealed... I've never done any of that before so it was quite a learning experience!
 
We also bought a Hoosier Cabinet: 
 
 
If you're like me and not familiar with Hoosier Cabinets, Wikipedia can explain it to you. It is in good condition, and I was really excited to get it home, cleaned up, and stocked with some of our overflowing kitchen items that I never seem to find a good home for.  We'll eventually put this in our new kitchen or pantry area when we get to that house remodeling project.
 
We haven't planted our vegetable garden yet, but hope to do that soon. I did buy some rhubarb (about 14 pounds of it!) and made rhubarb sauce.  I froze the rest, and intend to make a few (or several) batches of strawberry-rhubarb jam, which Eric claims is better than regular strawberry jam.  More precious than gold, I realized last year, when he hoarded it and wouldn't let me give any away! 
 
 
Happy Spring!


Tuesday, September 11, 2012

Canning Green Beans

I requested and received a pressure canner for my birthday back in January for this summer so that I could can green beans.  I've never been happy with how my frozen beans turn out.  They always seem to get freezer burnt, and it's almost the same amount of work to blanch and cool and bag them as it is to can them.  Since you can only do low-acidity vegetables like green beans in a pressure canner, I was anxious to give pressure canning a try.

First I snapped all of the green beans' ends off.  You can use a knife or just snap them with your fingers.  You can leave the beans whole length, or cut them into one-inch pieces.  I think you fit more in a jar if you break them into smaller pieces, so that's what I did.  Snapping beans is somewhat rough on your hands.  I told Eric that pretty soon my hands are going to resemble that of our Amish neighbor's wife!


Rinse the beans in a colander.  Clean your jars and put the lids in a pan to heat up (but not boil).  I got the water in the pressure canner heating but was careful to not let all of the water evaporate up out of it.  My pressure canner's directions said to put 3 quarts of water in.

I then started packing green beans into the warm jars.  I put about 1/2 tsp of salt into the top of each jar and then used the funnel to pour boiling water over them 1 inch from the top. I've also learned that as long as you aren't doing too big of a batch, you can use a tea kettle to pour the water.  Much easier to handle than a full pot of boiling water.


Wipe the rims and place the lids and bands on each jar just like you do with water bath canning. 


Make sure you follow the directions that came with your pressure canner.  You basically allow the canner to heat up on medium to high heat until a steady steam comes from the vent.  You let it vent for 10 minutes, then put the pressure regulator over the vent.  This will start the process of allowing the pressure to build up in the canner.  You will see the plug pop up when pressure has filled the canner, and then the guage will start to move higher.  Allow the pressure to build to the proper pounds of pressure that the recipe calls for.  For green beans, this was 11 pounds of pressure.  It is a little tricky to keep the pounds of pressure on the right level (not too high and not too low), but you can do this with adjusting the flame of the burner.  For green beans you process for 20 minutes, then remove the canner from the stove.  Allow the pressure to go down on its own, then you can remove the pressure regulator and open the lid to remove your jars. 

I've been doing about 5-7 pint jars at a time.  It really is not difficult, and now we will have beans throughout the long winter!

Friday, August 3, 2012

What I like about putting food in jars:

1.  You have to follow a recipe.  This might be tough for some people.  Some daring cooks throw ingredients in a pot and watch the magic happen.  I have never been one of those cooks.  I follow a recipe.  Pretty much every time.  I still pull open the cookbook to see how to make a pie crust, even though I've made pies a hundred times.  I still follow the recipe on the back of the Bisquick box for pancakes, even though I make pancakes at least once a week.  Sure, I experiment sometimes with substituting ingredients if I don't have something on hand.  But my mac and cheese is straight out of the Betty Crocker cookbook.  Somehow I never manage to accurately memorize a recipe and don't even ask me to experiment on a classic!  With canning, you need to follow the recipe to a T, or you risk ruining your hard work or worse, getting sick off of improperly preserved pickles.

2.  Jars of food are pretty on a shelf.  There is nothing better than organizing your little stockpile of jars.  I totally get why people on the coupon shows buy and stockpile.  They have OCD about arranging their treasures on the shelf.  I am not a couponer, but I do enjoy lining up my jars.  The raspberry and strawberry jams are a beautiful red, and the pickles and green beans are amazing shades of green. 


3.  Preserving tradition.  People used to can out of necessity.  Then it became something to do to save money and to put up one's garden.  Now, it is a hobby.  Canned products in the grocery store are so cheap, it is arguable if you really save all that much money canning your own fruits and vegetables.  Plus, frozen products are so handy and taste pretty fresh.  But there is something nostalgic about food in jars that gets me going.  I mean, how neat is it that I am storing my jars where Eric's grandmother (and her grandmother) stored hers for years.

4.  Preserving local.  I am a "local" nut.  I am not a true locavore (someone who eats food only from within a certain mile radius of home).  But I believe in the value of buying local for economic development and to support healthy and vibrant communities.  At work, I am involved in a variety of projects to increase the utlization of local products in our county.  So I guess I'd better walk the walk and talk the talk.

5.  What else am I going to do with all of these cucumbers?  I can't stand to see things go to waste.  And since Eric is REALLY into gardening, I've gotta do something with the stuff!  I used to just freeze everything, but it's not that much less work and the taste of freezer-burnt green beans is absolutely disgusting. 


6.  It lasts for a long time!  Canned products are shelf-stable for 12 months to ? years.  I like feeling that if we had a complete societal meltdown and we all had to live off of the grid and independently, we'd survive a lot longer than most!  I'm not paranoid, and no, we do not have a bomb shelter just in case.

Monday, July 30, 2012

Pickles Pickles Pickles, Oh My!


The past few weeks I have been trying to keep up with the abundance of our garden.  I am very tired of cucumbers and zucchini, two vegetables that ANY gardener can grow because they produce like maniacs.  I am not a huge pickle fan, but my dad loves bread and butter pickles and Eric eats sweet gherkins (little whole pickles).  We do not like relish, but I am even making relish just for fun.  I have also canned over a dozen jars of dill pickles.  I have no idea who is going to eat all of these pickles, and I will very likely be giving jars away to anyone who likes them.  Here is how I can bread and butter pickles:

This is my family's recipe for bread and butter pickles.  You can also find a ton of pickle recipes on the internet.  I recommend looking for ones approved by the USDA and Cooperative Extension, as there are some unsafe recipes floating around out there.  Here is a USDA Guide to Pickling, with recipes.

I just learned that powdered alum, a common ingredient in traditional pickle recipes because it helps to make pickles crisp, is actually toxic in amounts over 1 ounce.  I encountered alum in a dill pickle recipe given to me by a relative.  I was tempted to use it anyway, but it just isn't worth the risk.  I used pickling lime (Ball Pickle Crisp) instead.  We have not tasted the dill pickles yet to see if they are crisp, because it takes a little while for them to develop a good flavor.

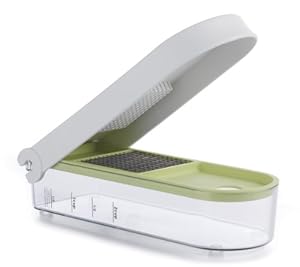
Anyway, back to the bread and butters!  Cut your cucumbers, onions, and peppers.  I was crying so badly after 6 onions that I stopped there.  Anna came in and was watching me cut vegetables and she was even crying; the whole kitchen was fumigated with onion.  After my first batch I picked up a Progressive onion cutter, like this one.  I am in love!  I had way fewer tears using this handy kitchen tool.

Let the cucumbers sit under ice for 3-4 hours.  Drain.  Simmer your pickles in the vinegar/sugar/spice mixture.  The spices I use are celery seed, tumeric, and ground cloves.
Stir the pickles every now and then while simmering for 15 minutes.  It takes awhile for them to come to a simmer.  I snacked on some freshly picked blueberries while I was waiting.
I also prepared my jars and water bath canner so that everything was ready to go as soon as the 15 minutes was up.

Pack the hot pickles and pickle juice into hot, sterilized, jars.  Place the hot lids on them and screw on the bands.  Process in the hot water bath for five minutes. 
Remove the jars and place them on a wire rack to cool and enjoy the sound of jars sealing!

Monday, July 23, 2012

Red Raspberry Jam


I really enjoy picking fruit.  I mean, what could be better than being out in the sunshine picking fresh beautiful berries and bringing it home to make yummy stuff like pies and jams?  So far this year, I've picked strawberries in June, and blueberries and raspberries in July.  I drag my girls along with me, so I rarely pick for more than an hour. 

A couple of weeks ago, my dad and sister went with us to pick raspberries.  It's been a hot summer, so the berries we picked were some of the few left on the bushes.  Here is step-by-step how I made raspberry jam:


I washed the berries and put them in a pot to mash one cup at a time.  Added pectin (I buy Certo boxes) and followed the directions on the box. 


The recipe is the same on the box as it is in this You Can Can! book.  Yes, I can can, can you?


I stirred the raspberry jam, while heating.  Once it boiled, I added the sugar all at once.  Make sure you have enough sugar on hand!  This recipe took 6 cups!  I often do double batches.  You'll get diabetes just looking at 12 cups of sugar.


While your jam is "cooking," put some lids in hot water to keep warm and start your water bath canner boiling.  Clean your jars.  I often run my jars and rings in the dishwasher on sterilize and try to time it so that they are hot and ready at the right time.  You could also just boil your clean jars in the canner.


Check on the kiddos.  Yup, Clara is still sleeping.


Anna is watching cartoons...


Uh oh, Anna decided to come check out what mommy's doing.  "Mommy doing?"  Here, play with some alphabet fridge magnets.  Later, I resort to throwing canning jar rings on the floor for her to play with.  She likes to put them on her wrists and ankles.


Put your raspberry jam into the hot, sterilized jars.  Fill to the right height on the jar, according to the recipe.  Beautiful!


Get the lids out of the hot water to place on the jars.  I use a magnet stick, which came in a canning kit.  Oops, the end of it melted because it was resting against the hot canner.  Make sure you don't do that! 


Put the lids on and screw the bands tight, but no need to crank it.  Put them in the canner and process 5 minutes, according to your recipe instructions.  Make sure you time it from when the water begins to boil again.


Dishes to wash.  But before you know it, the timer goes off and your jam is processed.


Remove jars and place on a wire rack.  My favorite part is listening to the lids pop as they seal.  It is so satisfying!


Clara is still sleeping.  What a good baby!


With a little bit of work, you can put up plenty of jam for a year's worth of toast, waffles, and bagels.  Eric especially loves homemade jam.  He even gets pretty possessive over it, so I have to make extra for family and friends to give away (and sneak it to them).  Strawberry and raspberry are his favorites, but I've made peach jam, too.  Blueberries I'd rather just freeze and make pies and other desserts from.  Oh what fun!  Next time I'll post about making pickles.  Stay tuned!